DesktopWidgets

Click any Image to zoom out

Get System Infos and Stats right on your Desktop

Visualy indicate Harddrive Usage

Track Time Machine Backups and see what keeps your Mac awake, or just keep a look at your Mouse, Trackpad and Keyboard Batter Levels

Add various Decoartions to your Desktop

Ad an RSS Feed or an Instagram Photo Stream right to your Desktop

About


DesktopWidget allows you to pin various Informations right onto your Desktop, these Informations are not interactive, so you cannot click or activate them accidentally, they behave mostly like a wallpaper. But instead of a static Image, you can get some interesting and relevant Informations about your Mac, without to use any additional Applications or browse the System Settings to get Informations about various things. In some cases, you don't need to open your Browser to check some Content online, DesktopWidget can attach various Informations right onto your Desktop.

A quick Overview of things DesktopWidget can integrate into your Desktop:

System Informations:
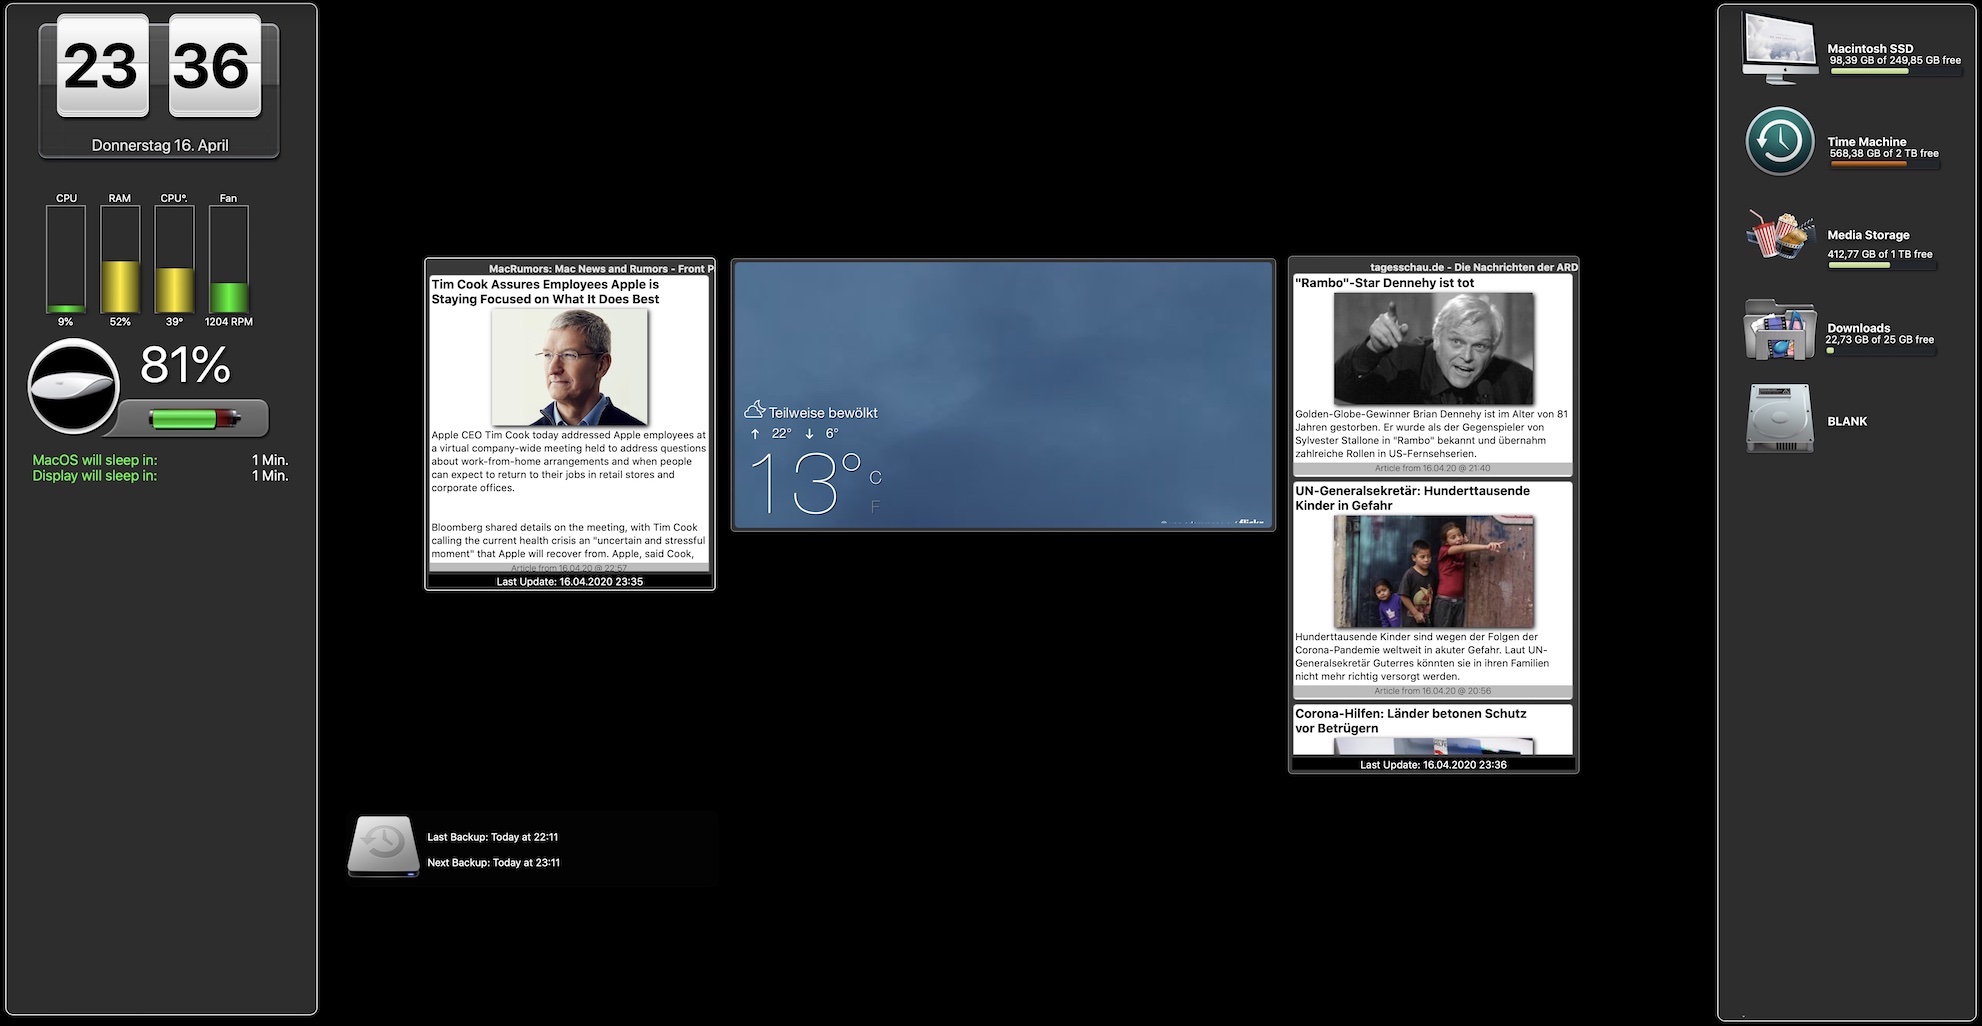
- Get a visual Information about a particular Hard-drive's Usage, with coloured Indicators if close to fully used
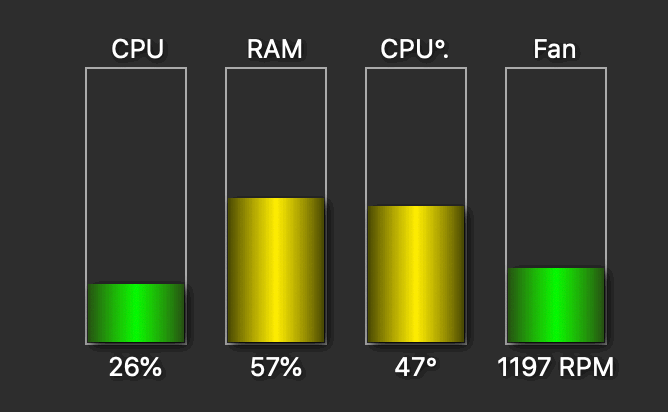
- System Info will show you live stats of CPU, Memory, Usage as well as CPU Temperature and Fan Speed in RPM.
- Get live Informations about current Time Machine Backup Progress and State.
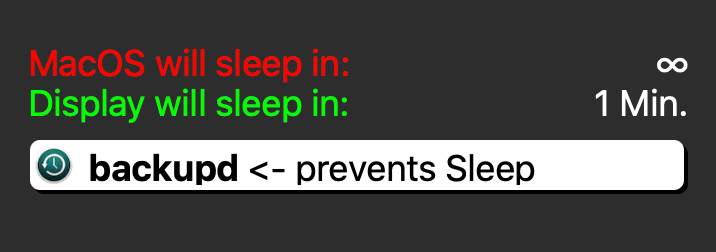
- See what is currently keeping your Mac awake and/or prevents Display idle sleep

Decorations:
- add coloured Shapes onto you Desktop Wallpaper to increase readability of Informations or to create more individual Setups
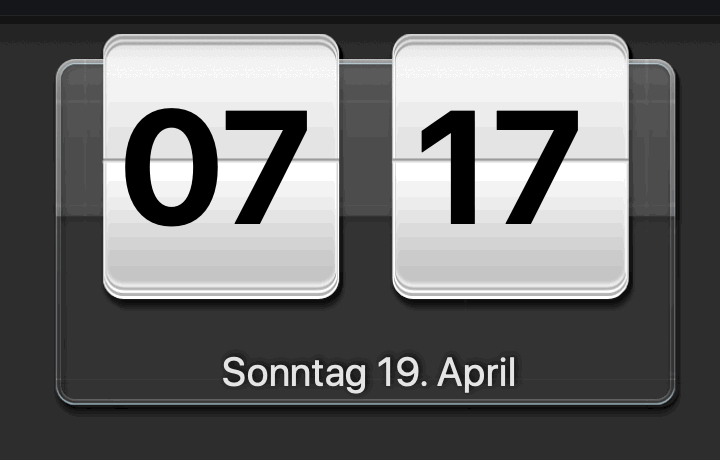
- Add a live Clock in large to your Desktop right with current Date

Peripherals
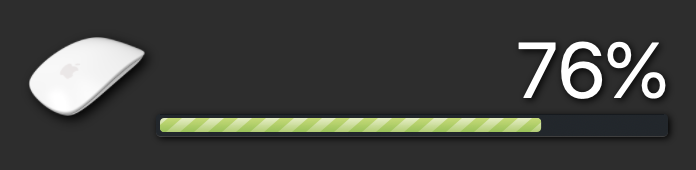
- get live Informations about you Magic Mouse, your Magic Keyboard or Magic Trackpad's current Battery Level and get notified if below 25% to remind you to recharge.

Online:
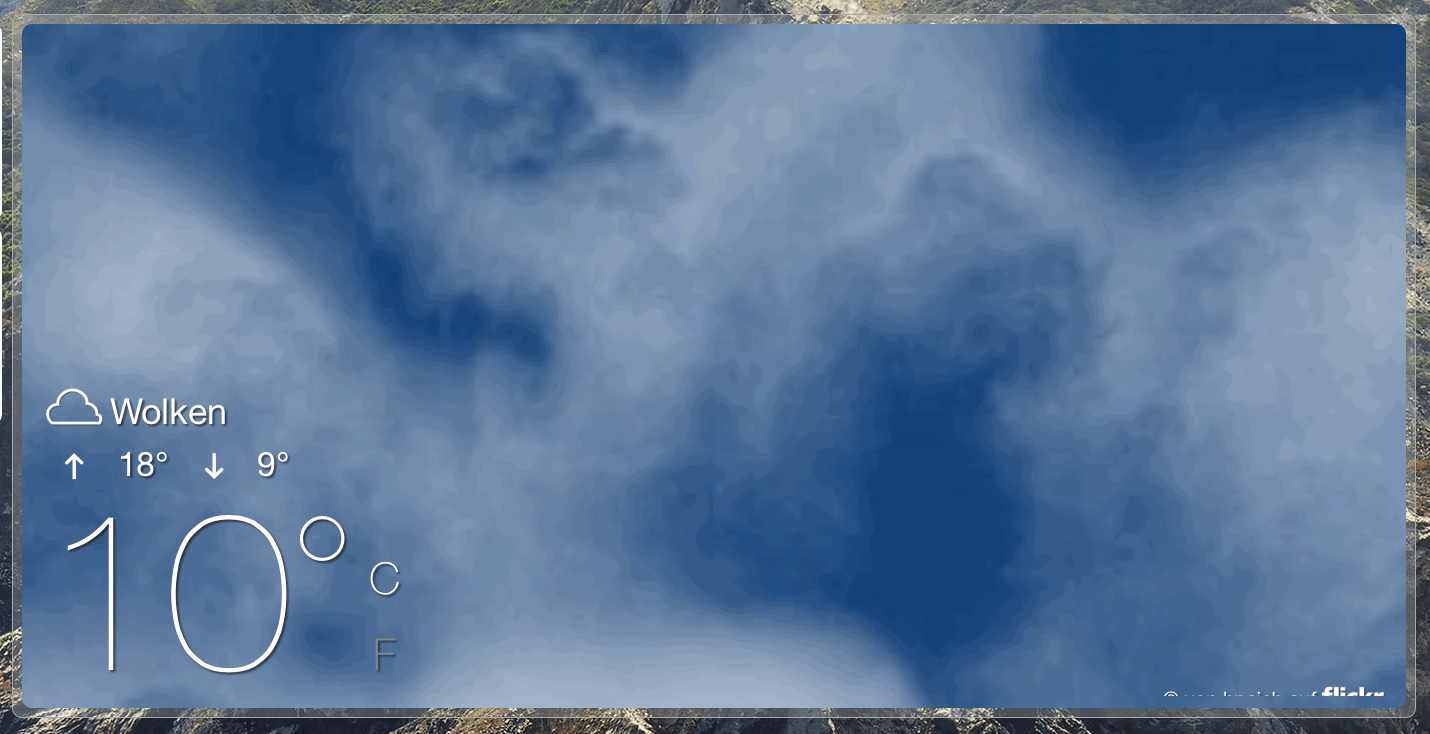
- attach any Website as part of your Wallpaper (e.g.: a Weather Forecast).
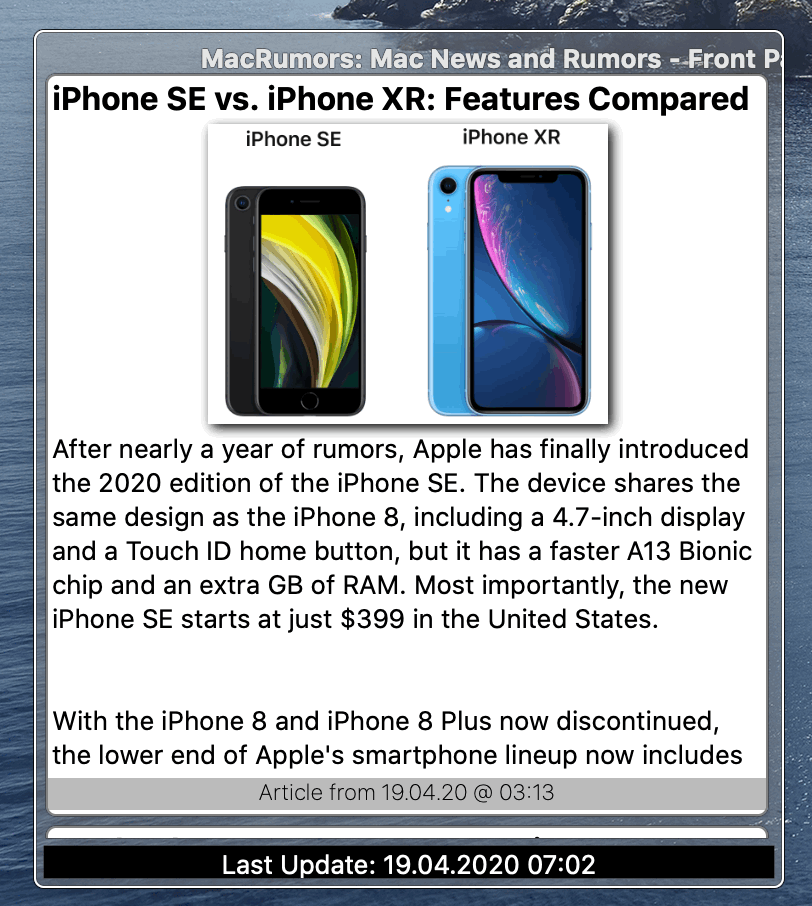
- add any RSS Feed right onto your Desktop, so you have a live ticker right in view without the need of a Browser
- get a User's Photo Stream from Instagram right onto your Desktop.

And this is just the beginning


Important Notice:
Most of DesktopWidget's Feature are built in and can be used out of the box, but some require additional Modules that can be added to DesktopWidget, to learn more about it, read the Modules Section.

Extension Modules


As mentioned above, DesktopWidgets needs additional modules to collect some Informations about your System, that's basically due to the fact, that some Informations can be collected with Tools or Methods that could be used to change some settings or behaviour of your Mac to an unwanted effect, therefor, various System Level Methods for collecting Data like internal Sensors or Fans are not accessible for Desktop Widgets in a regular manner, that's why there are additional Modules that solve this gap, they are al optional and can be used, BT aren't required if you want to use DesktopWidgets as it is.

Whenever an additional Module is required for a specific Feature, you will lern about it in the designated Section of this Website.

Installing a Module:
Download the Module you want to use, open assistant Window and click Settings. Once there, you will see a Module Section at the top, select it and you will see a List of all installed Modules, to install a new one, simply drag and drop the downloaded Module onto the Area in the Settings Window, to delete aModule swipe its entry in the list to the left, a delete Action will appear.

In Catalina it may be required to do some additinal actios to make the Module run.
If you launch a Module the first time you get a Warning that MacOS cannot verify the App, if so, choose the "Show in Finder" Button, once in a Finder Window, right-click the Module Application and choose "Open", once done, confirm again and you should be good to go.

You don't need to worry about Modules in the future, they are controlled by DesktopWidgets, if you quit the app, all Modules will quit as well, and launch if needed by DesktopWidgets.

There are two ways to install Modules: 1 the classic way, click the download button, extract and install as described below, or 2. use the easy way with ModuleDownloader. This is a separate App the list all Modules that are available, shows you which one you already installed, allows easy removal or update if needed, get it here:

ModuleDownloader

System Informations


This Desktop Widget will show you live stats of your currently used CPU, RAM, CPU Temperature and Fan Speed.

This Widget can be used as it is, the only limitations is, DesktopWidgets can collect Data only for current CPU and Memory usage, but not for CPU Temperature of Fan Speed, therefore, you need a additional Module that collects this Informations and sends them to DesktopWidgets.

Usage:
Simply click the "Add Widget" Button and position it where you want it to be, click either "End editing" in the Assistant or double-click the Widget to attach it to the Desktop.

Disk Usage Widgets


These widgets will visually indicate the current Disk Usage to tell you if your Drive has enough Storage left, the Progress-bar changes its Color based on Usage Percentage, if its green you are good to go, if it reaches over 80% it turns orange, and if it reaches 90% and more, it turns red,

Usage:
To add a Widget open the assistant and go to the Drives section, you will see a List of all attached Drives to your mac, now pick one, click and drag it out to the Desktop, release, once done, resize it ad reposition it to your needs, once done, double-click the Progress-bar to send it to the Desktop Level.

Time Machine Monitor


This Widget also requires an additional Module to monitor Time Machine activity and progress.

This Widget cannot be resized, it is aas it is, you can position it freely on your Desktop but not resize it, but you can set a custom Background-Color for it to make it look more like your taste.
Once done, again, double-click it to end editing.

PMSet


This Widget will tell you what keeps your Display or Mac awake if you ever wonder why your Machine does not idle sleep.

Please keep in mind, the Widget will show you a lot of Process used by MacOS, and they may sound and look very cryptic, this Widget is more for advanced Users, who are more familiar with MacOS internal Processes.

Dekorations


This section contains various Widgets with no real Informations, they are for decorative purpose, e,g., The Clock is just a Clock, but in large, the more interesting part is the Shapes Widgets, its purpose is this, if you use a colourful or photo as a Wallpaper, it might be difficult to read some other Widgets like the Drives, PMSet and various others, therefor are the Decorations, they allow you to cover specific parts of your Wallpaper to s a solid opaque cooler on which you can place other Widgets to increase their visibility, check out the Image at the top to get an idea what i am talking about.

Peripherals


This Widget allows you get a graphical battery Indicator for you Peripherals like Magic Mouse, Magic Trackpad and Magic Keyboard.
Please keep in mind, you can add each type only once, so do not attempt to add a Widget for your Magic Mouse twice, it won't work.
Also this Widget will automatically warn you if a Battery Level reaches 25% or less to remind you to recharge! The Warning will appear in the Notification Center.

Important Notice:
This Widget supports two display modes, either the regular enlarged style that cannot be resized, or a minimal Version which van be resized and uses less predefined Images. This Mode is useful if you want to add multiple Versions of this Widget, e.g. for Mouse and Keyboard, so they do not take more space on your Desktop than needed.
But there is one more thing (only for the minimal Layout, due to available space):
For the Magic Mouse (while it recharges via USB Lightning Cable), DesktopWidgets detect whenever you plug your Mouse for charging and indicates this and also tracks the current charging Progress more frequently than usual.

Web Widgets


The Web Widget is a very powerful and handy Widget, it allows you to pin any website right onto your Desktop, and with the auto-reload Feature, you can stay up to date, this is very useful for WebApps, so basically Websites that were built to look and feel like native Applications.


The Web Widget remembers the current Scroll Position, so if you setup a Website, scroll it into the desired Position so you can see what you get.


Important Notice:


The Web Widget will always try to use the mobile Version of a Website, so if available, you will see always the Website as it would look like on your Phone e.g.


The web Widget also supports YouTube Videos, if you add an URL to a YouTube Video, you will get  a native Video Player, but to keep it simple, it has just one control, a play/pause toggle, nothing else.


Interaction:

The Web Widget is interactive on demand, so in regular, the Web Widget stays on the Desktop not interfering with your work, but it can be activated on demand, to do this these are the rules:


The Web Widget can only be activated if:


  • there is no other Window open on Screen, this means also no other Application that is active
  • The Desktop MUST be the active Application itself


To achieve this, hide or minimise all other Windows and click the Desktop once to make it active, once done, move your Mouse Cursor over the Web Widget you want to activate and press the CMD(Command) Key on your Keyboard, you will see the Widget gets a short animation and its borders get red colour, in this state you can either browse the Widget, click Buttons or toggle playback  for a Video. To leave this mode, simply release the CMD Key and the Widget will flatten back to the Desktop.


Another behaviour exception:

If you edit this Widget be moving or resizing it while in Edit Mode, you MUST click the “SET” Button in the top left Corner to tell DesktopWidget to remember this state, this is to prevent accidental changes, so if you change the Widgets Position or size and do not click the SET Button, if you click the “End editing” Button in the Assistant, the Widget will reset to its previous State.


Other important Limitations:

Do not use this Widget for Logins or similar stuff, it can hardly remember your login and you would need to login each time, also some Websites leave widely inside this Widget, e.g. Instagram, therefore there is an alternative for this (see Feed Widget).


Feeds Widdget


The Feed Widget can handle any RSS 1.0, RSS 2.0 or ATOM RSS feed and create a readable List of Articles for you, in combination with the Auto-reload its very useful for News Ticker Feeds e.g.


The RSS Widget allows you can either Show or Hide the leading Image of any Article

You can choose this from the Assistant, this can be useful if you prefer to see more Articles in a smaller list, to read a full article, simply activate the Widget with the CMD Key and double-click the Title to read full Articles in your Browser on the origin Website.


Beside RSS, this  Widget works also in Instagram Mode:


So before you add this Widget, you have to choose what it shall be, an RSS or Instagram Feed, if you choose Instagram you simply set the Instagram’s Username for the Person or even easier, use the built in Search method to search for Users, once done you will see the latest Photos and Videos of this Users Timeline, yes Desktop Widget supports also these short Video Clips from Instagram, if such is available, you will see a smaller Play Button in the bottom right corner, indicating that this is a Video,  this Widget is Interactive as well as the Web Widget in the same manner, so please read more about it in the above Section, once activated , you can either click a video to toggle playback or double click any entry, Photo ir Video to open this Post in your Browser where you can like or comment it directly on the Instagram Website-


The Instagram Mode offers another additional Feature:

If you want, you can add a Profile Image to the top of this Widget showing you the Users’s Photo and real Name before their Photos gets listed.


One vey important Warning:


Despite the auto-reload of this Widget, DesktopWidget does reload it anyway each time your Mac will wake from sleep unless the Timer is set to Never, Instagram has an abuse Protection to keep their Service running, so if you request Photos too often in a too short time, you will get a 12 - 24 hours lock, this happened to me during Development, the result is that you get an empty Widget, this block is based on your IP Adress, so if you have the ability to get a new one , this block may go away sooner, this all said, do yourself a favour and do not mess with the auto-reload timer, none needs a 1 minute reload timer, set it to 15 minutes or more, this may be frequent enough for most cases.


Sticky Notes


This Widget mimics a simple Sticky Note, you cna customize its size and Position, and use it as a quick Note while doing something, e.gyou take a call,, and want to write something down.

How to use?
Once you added the Note, you cannot move it yet, only resize, to move it you need to press and hold the OPTION Key on your Keyboard, once done, the Notes Borders turn green to indicate it is movable. Once you release the OPTION Key, the Note becomes fixed again, to send it to the Desktop, simply double click it.

Here comes the essential part:
How to raise it for editing?
Similar to the feed or Web Widget, ensure no other Window is open on your Desktop, if you use Spaces, switch to an empty Space, move your Mouse Cursor over the Note and hit the COMMAND Key, the Note is now raise for editing, you can either copy and paste, drag into or simply write,
Once the Note is editable or raised, it offers you two additional Actions:
1. Hide Content (useful to cover your Note while someone may e watching)
2. Float a Note: This will keep your Note float above all other Windows on top, always vsibe and always accessible, but only while raised.
Once you are done, double-click it to pin it back to the Desktop.

The Sticky Notes Widget has an additional feature, you can convert colored Text to plain Text, this wil remove any Colors, Links, different Fonts and Images and return just pure text, you can either convert on the fly or enable this at start and this Widget will accept pure text only in the future

Flickr by tag


The Widget allows you to add a Flickr Photo Stream right onto your Desktop,

No Login required or supported, it uses tag keywords to search Flickr.
Based on the tag or tags you search for, you will get a loop of up to 100 newest Photos, This may be less lower if you restrict the Photos to be just Landscape or Portrait Mode.

The Photo Aspect Ratio setting:
DesktopWidgets allows you to filter Photos to be just Portrait, Landscape or both, this is useful if you shape your Widget to a specific Frame and want the Photos to fit as good as possible
but even if the don't, you can additionally set the Photos to scale into given Size of the Widget, so you can prevent having empty bars at the bottom and top or left and right.

This Widget supports also the COMMAND Key Option to activate, if activated, the Widgets border are white and you can hover your Mouse over it to get a Title for each Photo if available, furthermore, once activated, you can SHIFT+click a Photo to view it on Flickr in your Browser,

Spaces


All built-in Widgets support Spaces Assignements.

What does this mean?
MacOS has a Feature called Spaces or Workspaces, its part of Mission Control and it allows you to create multiple Desktops to organize your work on separate Desktops.
DesktopWidgets supports this now too, this means, you can assign each Widget to either a spceific Space or to all Spaces.

Some limitations:
DesktopWidgets supports Spaces in a very simple setup. This means, adding or removing Spaces on the fly will break the whole feature, also Desktopwidgets does not support Fullscreen Apps and also not the feature to organize Spaces with fullscree App Windows between them, so how to use it?

To be able to use this Feature, DesktopWidgets assumes you have already created all your Spaces and fullscreen Apps are at the far right sside of the Spaces list in Mission Control, DesktopWidgets collects Spaces Informations only once at launch, so prepare your Spaces before you start using them with DesktopWidgets, also reordering Spaces does not work either. DesktopWidgets count the Spaces starting with 1 is the first, so if you reorder Spaces, Desktopwidgets will not care.
Another important limitation:
Space assignements work only for one case, show or hide a Widget,so the size and position for each Widget do NOT change between Spaces.

Finally some Info:
Why do all Widget appear once i switch Spaces and go invisible afterwards? This is how DesktopWidgets gets notified that you changed a Space, it needs to wait for MacOS to tell us about this Action, therefore this effect that all Widgets appear once shortly...

Available Modules

Welcome to Module Installer

An optional way to install, delete, or update modules using Module Installer.

To get started, follow these steps:

  1. Download Module Installer from here.
  2. After downloading, locate the downloaded file (usually in your Downloads folder).
  3. Move Module Installer to your Applications folder.
  4. Open DesktopWidgets.
  5. In DesktopWidgets, navigate to SettingsModules.
  6. Click the button in the bottom left corner to launch Module Installer.
  7. Alternatively, you can open Module Installer directly from your Applications folder.

Important Notice:

To prevent unexpected behavior, always quit DesktopWidgets before installing, deleting, or updating modules.

Enjoy using Module Installer for a seamless module management experience!


But if you peffer, you can download Nodules manually from below:

IMPORTANT INSTALL NOTICE FOR ALL MODULES: After you downloaded a Module,do the following:

- Quit DesktopWidgets first
- Right-click the downloaded Module and choose "Open..."
- If asked clicked Open Application

The Module will prompt with an error and quit, now you can launch DesktopWidgets and install it as intended, this is important due MacOS Security Layer preventing 3rd Party Apps outside of the Mac App Store to launch without User Permission and this is the reliablest way to bypass it, otherwise it may happen that you click "Add Module" in DesktopWidgets and nothing happens...
Spaces Module
This Module is required if you want to use the Spaces Assignement for Widgets, this means, you can setup which Widget shall appear on which Space/Workspace.
Downlaoad
TMModule
This Module is needed for the Time Machine Widget, it monitors Time Machine activity and sends the current progress data to desktopWidgets, its required, because Desktopeidgets is not able to accesss this values by itself
Downlaoad
Sensors
This Module is needed for the System Info Widget, it extends the Widget with CPU Temperature and Fan Speed Values, without it, these bars stay at 0% in the System Ifo Widget.
Downlaoad
PMSet
This Module is needed for the PMSet Widget, it enables to collect tje data needed to build the resulting Informations about what keeps your Mac or Display awake.
Downlaoad
CodeRunner
With this Module you can run basic Bash/Shell, Ruby or Python Scripts and display their output on your Desktop, you can customize the Look & Feel as well, this Module supports also ANSII Colors in Scripts like Ruby e.g.
Downlaoad
Weather Widget
This Moudle uses your current Lcoation to collect current Weather Informations from OpenWeather.com and dispalys them with Animations for Day or Night
Downlaoad
NetMeter Widget
This Module will add a traffic meter for your active Internet Connection and display the current Speed for In and Out, it supports two display modes, a circular gauge or liner progress bars.
Downlaoad
Pinger Module
This Module is requred of ypu want to get live Ping Informations in the NetStack Widget
Downlaoad
iOSStack Module
With this Module you can see all the iOS Devices that are in your Network and trusted with the MacOS Computer you are using. You get a brief Information about the Device itself and also a continous battery and charging state monitoring...
Downlaoad
RAM Usage Module
With this Module you can see the top 10 Apps and Processes that use the most Memory on your System
Downlaoad
LightControl Module
With this Module you can turn On or OFF all Lights in a given Room/Zone by Shortcuts or toggle each bulb state by buttons
Downlaoad
These Modules will appear in the Widget List at the bottom under "Modules", imagine these Modules as simple little apps running alongside DesktopWidgets.